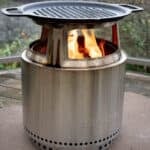
How to Use the Solo Stove Bonfire and Grill Grate Hub Accessory
Steps on how to set up, light, and run a fire that can grill food using the hub accessory.
Cost: $36.00
Equipment
- 1 Solo Stove Bonfire
- 1 Solo Stove Hub Base (There are three sizes to purchase, we used the Bonfire set up.)
- 1 Solo Stove Bonfire Grill Grate
Materials
- 8 pieces dry cooking wood
- 1 tumbleweed starter
- 1 set long tongs
- 1 charcoal tool
Instructions
- Ignite: Lay four pieces of wood in a log cabin set up with a tumbleweed starter. Light the tumbleweed starter and let logs ignite.
- Feed Fire: After 20 minutes of the initial firing add two more logs. After they ignite let burn for additional 20 minutes. The goal is to develop a base of hot embers if grilling. (If just enjoying the fire pit alone, then continue adding a log every 30 minutes or as the fire dies down.)
- If Grilling: Once the embers are developed, take your charcoal tool and move the fire and embers to one side of the grill so you have one half of the Bonfire fire pit with embers and another side with no embers. This is the two-zone cooking set up. Add one more log. Add the hub base and grill grate so it can warm up.
- Grill: After 20 minutes the grill grate should be preheated to roughly 450 - 500 degrees (F) and it's time to add whatever you want to grill or cook. Follow recipe instructions for times. It's nice having one side over direct heat and one over indirect heat so you can move items around should the protein be getting too much direct heat. You can also grill using cast iron cooking as well.
- Cool: If still using the Solo Stove as a fire pit then use heat safe gloves to remove the grill grate and hub accessory. Store them away from people so it can cool. DO NOT COOL on wood or a flammable surface. Using your charcoal tool move the embers back to the center of the stove, add wood, and let the fire re-ignite. Clean based on the notes in the article above.
Notes
Flare Ups: When cooking over live fire, fat will drop from proteins (especially beef) and ignite when the fat hits the embers. This is unavoidable and why you want hot embers, not large flames, when cooking over fire. You can mitigate this by moving your proteins around between direct and indirect, or you can use water in a spray bottle to minimize the flames.
About Time: When cooking with live fire, the times of how long things take to grill will vary based on the weather and what you are cooking. For any meats use an instant read thermometer to assess when the food is done to your desired temperature.
Storage: After you have let the Solo Stove cool overnight, and you have followed the steps to clean and re-season the grill grate, store the Solo Stove in a dry place for extended periods of time, like your garage or shed. Avoid leaving the hub and grate accessories from sitting outside when not in use, and definitely not in the rain. Re-seasoning the cast iron grill grate prevents rust from forming.
