This post may contain affiliate links. Read more at our disclosure policy.
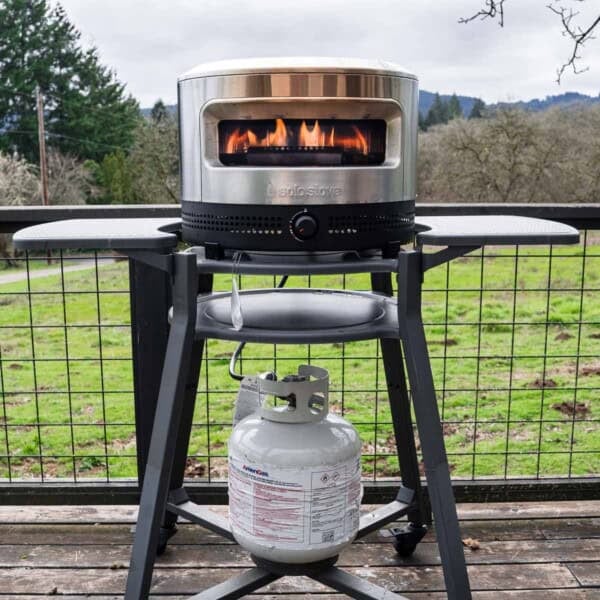
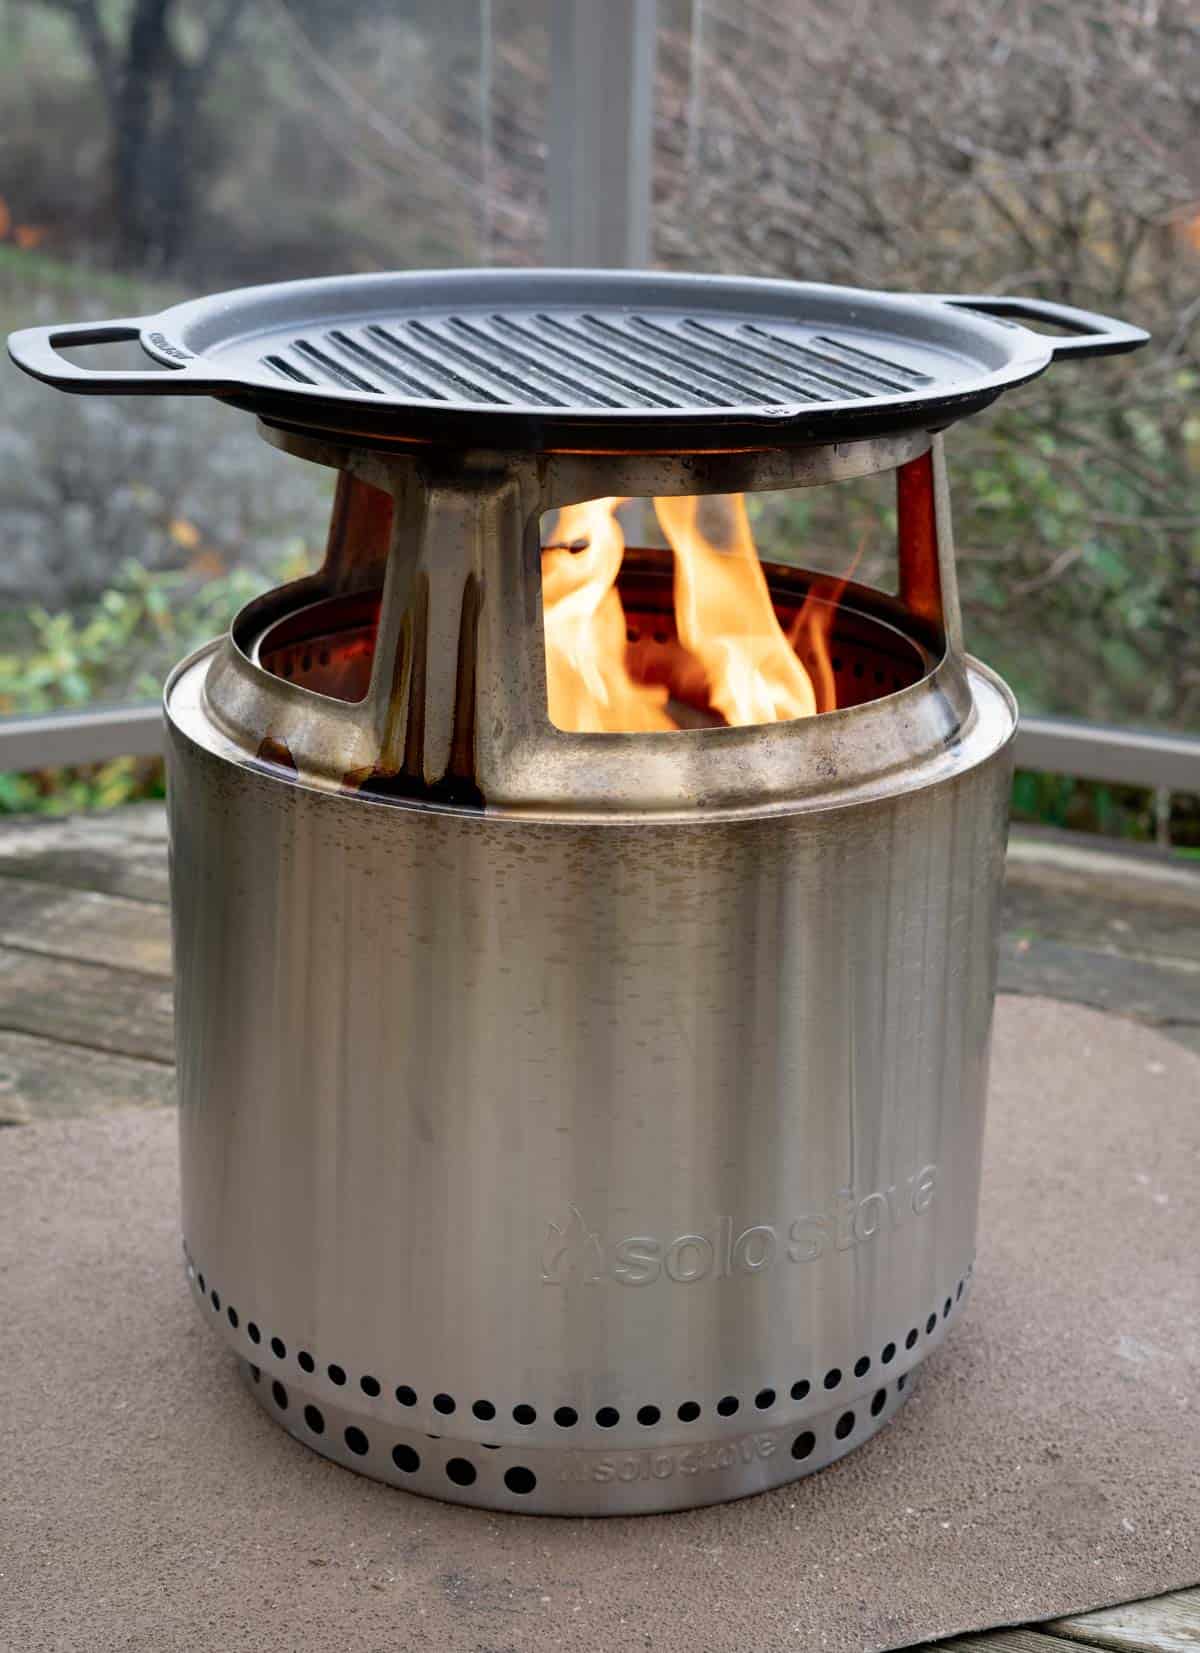
Learn how to use the Solo Stove Bonfire Hub and Grill Grate accessory with the smokeless fire pit. This lightweight, portable, fire pit is great for basic grilling or open fire cooking. There are few things more fun then sitting around an open fire with food and good company. Learning how to care for it will also keep it ready for fun experiences for years.
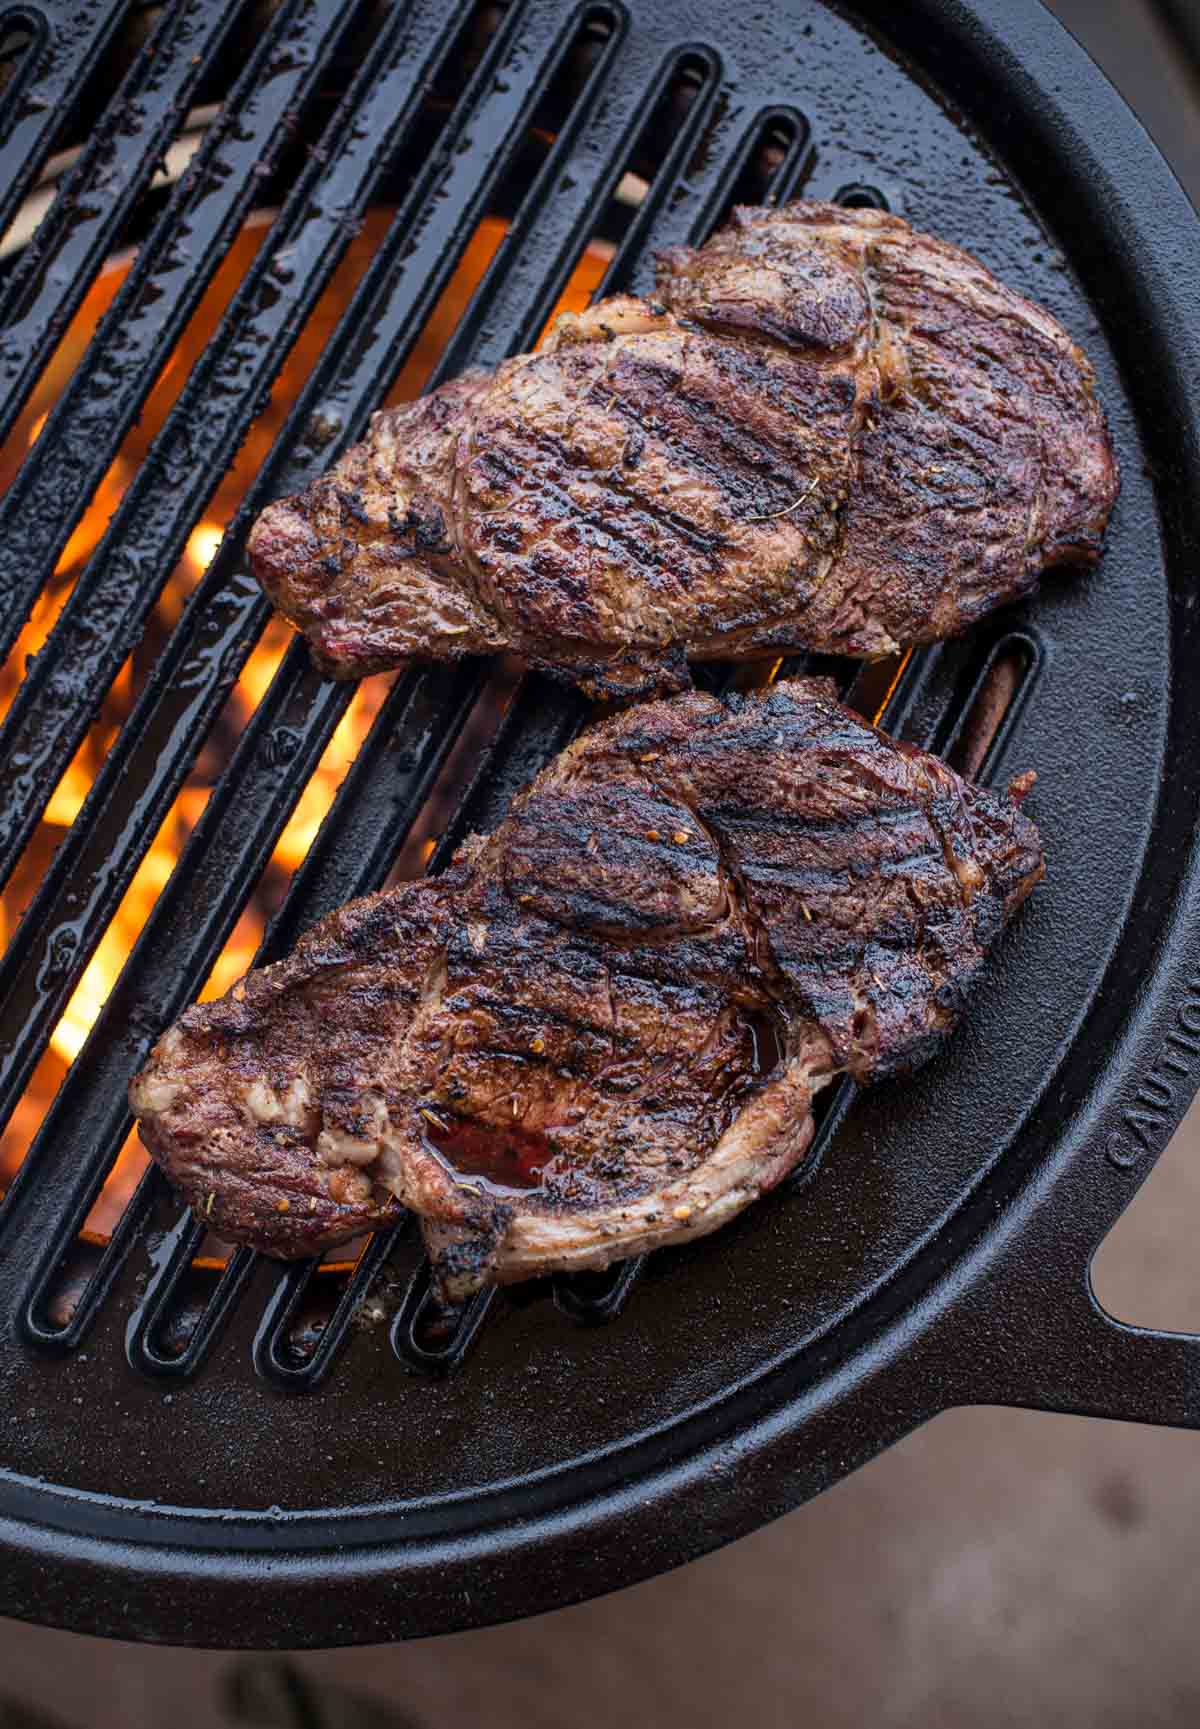
Table of Contents
Solo Stove is one of the leading designers and manufacturers of quality smokeless fire pits and their Pi Prime pizza oven. They have a wide variety of backyard fire pits that vary in size and now include bundle options for grill grates, planchas, or woks. While they won’t replace an actual grill with a top, it is a great, lightweight (and portable), fire pit that now has the ability for live fire grilling.
This product was sent to us as a media sample. All opinions are our own and we were not paid to write this article.
Review of Solo Stove Hub and Grill Grate
Tools
Before you get started using the Solo Stove be sure you have a few important tools on hand to make the experience more enjoyable. Most of these are available at local retailers or Amazon. The links are to products we use. Solo Stove also sells some of these as well.
- A good fire starter. We use tumbleweed fire starters because they have no chemicals and light fast. You can also use a sawdust brick or wads of paper. But the tumbleweed is compact, great on the go, and is dense so it burns well and lights dry wood.
- A sturdy match or lighter. It goes without saying that good lighters or a strong match is needed to light the fire starter.
- If using this product on your deck be sure you have a good fire safe grill pad and have the Solo Stove perched on the Solo Stove accessory deck mount (which will raise it a few inches above ground level for safety).
- Fire Extinguisher – Whenever cooking with fire a rechargeable fire extinguisher is essential to have on hand nearby. Be sure it is not expired and swap out or recharge based on the manufacturers recommendations.
- Charcoal Ash Rake – An ash tool is key for moving wood and embers around, especially if using the Hub and Grill grate accessory.
- Long Tongs – If cooking you want long tongs that are strong enough to grab the steaks and still not burn your hands while doing so.
- Heat Safe Gloves – Welding gloves or BBQ gloves (in the style of welding gloves) are great to have so you can pick up the grate while hot and then move it in case you want to continue using just the stove for the fire experience.
- Grill Grate Cleaning Tool – For the Solo Stove grill grate, use a non wired cleaning brush like the Grill Rescue brush or a nylon based cleaning brush. Avoid harsh wire-based brushes where the wires can come off, and get into your food.
Type of Wood
If you plan to cook on your Solo Stove Bonfire be sure you are using dried hardwood splits and not any type of treated wood or lumber. Hard woods burn without any acrid flavors and don’t have chemicals that could potentially seep into your food. Soft woods, like pine, have residual sap and odors that are acrid and taste bitter when cooking with it.
Wood splits are just that – split wood usually 10 – 12 inches long versus wood chunks or wood chips. You want to use splits with the Solo Stove.
Be sure the wood is split in a way that it fits inside the Solo Stove model that you wish to own. There are online wood companies, like Cutting Edge Firewood, that sell and deliver pre-cut wood sizes. Also if you can source your dry wood locally that is ideal (shipping is expensive). Most BBQ supply stores also sell wood splits of various styles.
If you plan to use the Solo Stove for bonfires, then use any non-treated dry wood.
We do not recommend using charcoal. While technically Solo Stove says you can, the heat units put out by lit charcoal are much hotter than embers from wood and can cause issues over time with the steel at the base of the fire pit.
Preparation
Be sure the Solo Stove Bonfire is assembled properly with the appropriate inserts. If using the older mode Yukon and the Hub – be sure you have the appropriate attachment to make the two work together.
Step 1: Set and Light The Wood
- Place two pieces of wood parallel to each other in the base of the oven with about 3 inches of space between them. Then place your tumbleweed started in the center between the two pieces.
- Place two more logs on top of the first two in the opposite direction (log cabin style), so that the two logs are slightly closer to each other than the first two (about 2 inches apart).
- Light the tumbleweed fire starter and it will then ignite the logs and begin creating embers that will keep your fire hot and warm.
Step 2: Maintain Fire
When live fire cooking you do not want large flames. Those flames will burn the meat versus slowly roasting it. So your goal is to make sure that you have a strong base of glowing red embers. Those are going to heat the grate and cook the meat. Then you slowly add more wood to keep the embers fed.
Would you like to save this?
- After 20 minutes from the initial burn, add two more pieces of wood to increase the temperature. Those two pieces will ignite and your base of embers will form.
- If you plan on cooking then use your ash tool to move the embers and burning wood to one side (one half) of the fire pit. Place the hub and grate over the fire pit and let pre-heat for 20 minutes. It should be at 450 – 500 degrees over direct heat at that point and ready for cooking.
- Place your desired item to cook over direct heat and follow the directions for the recipe. Add more wood (one log at a time) to keep embers fueled and a small flame going.
- If you do not plan to cook with the Hub and Grate, then just continue adding wood every 30 minutes to keep a steady flame.
Managing Flare Ups – When cooking over live fire, fat will drop from proteins (especially beef) and ignite when the fat hits the embers. This is unavoidable and why you want hot embers, not large flames, when cooking over fire. You can mitigate this by moving your proteins around between direct and indirect, or you can use water in a spray bottle to minimize the flames.
Step 3: Let Cool and Fire Shut Down
- When you are done using the Solo Stove Bonfire for cooking, start by using your grill grate cleaning tool and removing excess fat and grease from the grill grate. It’s important to do this while the grate is still warm as it’s the best time for it to fall off and into the fire.
- If done using the Solo Stove and grate, use the ash tool to make sure the fuel and embers are all on top of each other so that it burns out faster. Then, once completely cool, remove the grill grate and finish cleaning. If you have the top accessory add that to the pit so it can allow the flame to burn out as the oxygen is consumed.
- If you plan to continue using the fire pit, use the heat safe gloves to remove the grate and the Hub extension from the Solo Stove. Store it away from people in an area where it can safely cool. It will still be HOT for at least 30 minutes, so be sure it’s removed and stored away from people.
- Continue to add wood as desired or let the fire burn down completely and the Solo Stove to cool.
Chef’s Note: If you wait for the cast iron grate to cool – the residue hardens almost like concrete and becomes that much more difficult to clean. Treat the cast iron accessories like you would any other cast iron pot or skillet.
Cleaning The Hub and Grate
The Hub extension is going to develop a slight patina from the fire and from the cooking residue that falls on it. For ongoing cleaning use Bar Keepers Friend (or similar product) with a rag or magic eraser to wipe off.
For the cast iron grate remove any cooking residue with your cleaning tool or some type of non-abrasive sponge. Rinse with hot water. Once completely dry take avocado oil or grape seed oil on a paper towel and re-season the cast iron prior to storage.
How to Clean the Solo Stove
The Solo Stove models are made with 304 Stainless Steel, which helps it avoid rusting, compared to box store fire pits, and also makes it easy to clean. Never clean with a harsh abrasive as it will scratch the exterior of the Stove.
- Remove any ash from the base of the Solo Stove and discard it in a fire safe bucket. The new models have a grate removable ash pan to make this quick and easy. We use a galvanized steel bucket for discarding the ash. Note: Only remove the ash after it has cooled overnight.
- The upper edges of the Solo Stove may have some slight patina from the heat and flames. Use Bar Keepers Friend and a rag or non abrasive cloth to apply and wipe away the residue.
- Avoid water from getting into the Solo Stove. If it rains overnight, remove the ash and be sure any water is drained from the unit.
- Store for prolonged period of time in a dry covered space, like a garage or shed. The Hub is designed to fit upside down inside the Solo Stove model for travel and storage. And simply add the grate on top.
Be sure the grate and stove are dry before storing under cover or in a bag.
Frequently Asked Questions
The Solo Stove Bonfire starts at $259.99 (USD) for the Fire Pit set up with Ash Base and carrying case. The Bonfire stand, Hub, and Grate are sold separately or as part of a bundle. The complete Solo Stove Bonfire Grilling Bundle is $494.99 for the grill grate, hub, and Bonfire kit (including the stand accessory, removable ash pan, and carrying case).
You can buy Solo Stoves from their website direct or you can purchase at one of their local dealers (including online retailers). They also have an Amazon online store with various bundles. We recommend buying bundles to save on shipping and to maximize savings.
The Pi Fire is compatible with the Solo Stove models. However the Pi kit does not work with the Hub and Grill accessory. It’s a separate kit entirely. You need to completely remove the Hub to set up the Solo Pi Pizza kit. Alternatively Solo Stove has the Solo Pi Stove Pizza Oven, which is also not compatible. It is a stand alone pizza oven.
Yes, you can set up the Solo Stove on a deck. There is a base plate that raises the stove a few inches as an added accessory. Further we recommend you use a fire safe base mat, available online or at local hardware stores. We also recommend having a fire extinguisher nearby for precaution.
The hub and grate bundle is $219.99 at the time of this article. Note that this price does not include the Fire Pit. You can also choose the wok or plancha accessory for the same price. Separately the wok and grill grate are $89.99.
More Solo Stove Products
You can see a full list of all of our product reviews.
- Outdoor Entertaining: The TerraFlame S’Mores Kit is a great investment if you like entertaining and want a well designed set up for making s’mores inside.
- Pizzas: There is a reason Oprah picked the Solo Stove Pi Pizza Oven as one of her favorite things. It’s affordable and cranks out great outdoor pizzas.
If looking for outdoor heating check out our review of the Big Timber Wood Pellet Patio Heater.
About Vindulge
Mary (a certified sommelier and recipe developer) and Sean (backyard pitmaster) are co-authors of the critically acclaimed cookbooks — Fire + Wine and Fire + Wine Backyard Pizza — and have been creating content for the IACP-nominated website Vindulge since 2009. They live in Oregon on a farm just outside Portland.

Get a signed copy of our cookbook! Order Now
How to Use the Solo Stove Bonfire and Grill Grate Hub Accessory
Equipment
- 1 Solo Stove Bonfire
- 1 Solo Stove Hub Base (There are three sizes to purchase, we used the Bonfire set up.)
- 1 Solo Stove Bonfire Grill Grate
Ingredients
- 8 pieces dry cooking wood
- 1 tumbleweed starter
- 1 set long tongs
- 1 charcoal tool
Instructions
- Ignite: Lay four pieces of wood in a log cabin set up with a tumbleweed starter. Light the tumbleweed starter and let logs ignite.
- Feed Fire: After 20 minutes of the initial firing add two more logs. After they ignite let burn for additional 20 minutes. The goal is to develop a base of hot embers if grilling. (If just enjoying the fire pit alone, then continue adding a log every 30 minutes or as the fire dies down.)
- If Grilling: Once the embers are developed, take your charcoal tool and move the fire and embers to one side of the grill so you have one half of the Bonfire fire pit with embers and another side with no embers. This is the two-zone cooking set up. Add one more log. Add the hub base and grill grate so it can warm up.
- Grill: After 20 minutes the grill grate should be preheated to roughly 450 – 500 degrees (F) and it's time to add whatever you want to grill or cook. Follow recipe instructions for times. It's nice having one side over direct heat and one over indirect heat so you can move items around should the protein be getting too much direct heat. You can also grill using cast iron cooking as well.
- Cool: If still using the Solo Stove as a fire pit then use heat safe gloves to remove the grill grate and hub accessory. Store them away from people so it can cool. DO NOT COOL on wood or a flammable surface. Using your charcoal tool move the embers back to the center of the stove, add wood, and let the fire re-ignite. Clean based on the notes in the article above.
Notes
Nutrition information is automatically calculated, so should only be used as an approximation.