9 Ways To Light A Charcoal Grill Without Using Lighter Fluid
Apr 30, 2024, Updated Jun 25, 2024
This post may contain affiliate links. Read more at our disclosure policy.
Stop using lighter fluid to light your charcoal! Let us walk you through the best ways to light a charcoal grill without using lighter fluid. It will improve the flavor of your food and you can be happy knowing that you aren’t using something that can burn your hair off. Seriously, just ditch the lighter fluid forever.
Table of Contents
- Kicking Lighter Fluid to the Curb
- How To Light Charcoal
- Charcoal Chimney Starter
- Wood Block Fire Starters
- Tumbleweed or Wood Shaving Fire Starters
- Lighter Cubes
- Electric Starter – The Heat Gun
- Electric Starter – The Classic Electric Iron
- Cooking Oil and Paper Towels
- Twigs or Dry Sticks
- The Blowtorch
- Tutorial Video
- Pro Tips
Kicking Lighter Fluid to the Curb
Lighter fluid is a flammable liquid made from substances called hydrocarbons. The use of lighter fluid (also called starter fluid) is like spraying freshly picked apples with a badly made perfume – unnecessary and leaves a kind of weird chemical taste.
Lighter fluid isn’t necessary to get a charcoal grill started. It imparts a nasty odor and flavor. No matter what people tell you about its “safety”, we believe you should throw it out and adopt one of the following methods to start your charcoal. Your guests will thank you (and your taste buds will too).
Let’s explore the most popular methods to get your charcoal grill started without using lighter fluid. Lighting charcoal using the following methods works for both lump charcoal and (our preferred) charcoal briquettes.
How To Light Charcoal
No matter which type of charcoal you use or the method of lighting, you need a heating element to ignite the charcoal, like matches or a lighter. Once the charcoal is lit from the heat source, the goal is to then get hot coals as quickly as possible using lots of airflow. The more airflow, the hotter the fire will get and faster.
These methods work just as fast as, if not faster than, using lighter fluid.
To start, the charcoal should be dry. You should also be sure the charcoal has some gaps between them. You need airflow between the coal to encourage a good heat source.
“The more airflow the hotter and faster the charcoal will burn.”
The general rule of how charcoal works
Whether you’re grilling hot and fast direct, or setting up for two-zone grilling, these methods work and don’t impart the chemical flavor of starter fluid.
The amount of charcoal you want to light will also dictate how long it takes to let your fire get to grilling temperature. So if you are set up for two-zone grilling it won’t take as long for the charcoal to get to temp as an entire basket full of charcoal.
Charcoal Chimney Starter
Total Time To Grill: Less than 20 minutes
The classic Charcoal Chimney Starter works great. Full stop. It’s the easiest way to get your charcoal lit, it’s the fastest method, and one of the best grilling tools you should have in your inventory.
For a modest investment, you have a focused funnel that lights charcoal quickly (less than 20 minutes) using nothing more than newspaper and super-heated air to light the charcoal.
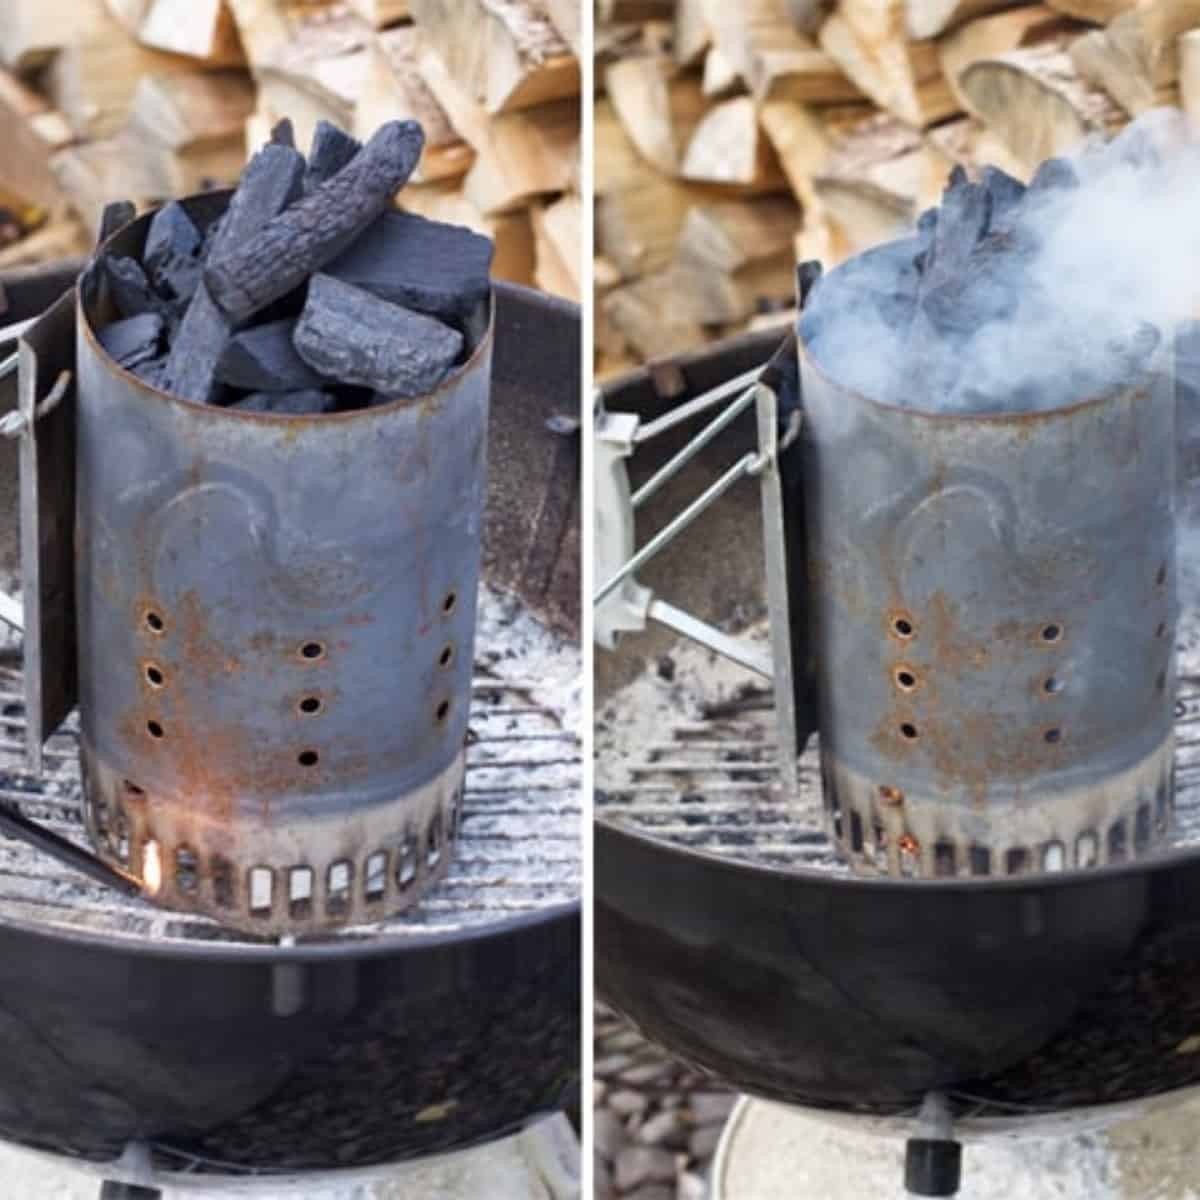
How to use a charcoal chimney starter?
Place a sheet of newspaper or paper towel loosely in the shallow base. This is the bottom of the chimney starter. Then pour your charcoal into the larger basket. Light the newspaper from below. As the newspaper burns it lights the charcoal on the bottom and the design of the chimney forces air in and up to concentrate the heat.
Safety Tip: Light the chimney while it sits inside the grill you plan to use, resting on top of the charcoal grate. Then when the charcoal is ready, dump the charcoal in the appropriate setup using heat-safe gloves. Then place the very hot chimney on a non-flammable surface to cool off. We typically have a large paver stone we always use. Then add your grill grate over the lit charcoal.
Wood Block Fire Starters
Total Time To Grill: Less than 30 minutes
Wood Block fire starters will come as compressed sawdust blocks. The upside is that they are inexpensive and they work well. They are a great alternative to a chimney starter. The downside is that they light your charcoal in very specific areas, so you need to stir up the charcoal when it’s lit to redistribute the heat. So it takes a little longer to get the fire to your desired temperature compared to a charcoal chimney. And because most are flat, you need to set them at an angle to be sure they light.
How to use wood fire starters? Place your charcoal in your desired setup, either the direct method or the indirect method. Nestle the wood block fire starters into the charcoal at a slight angle and then light the starter using a match or lighter. As the starter lights, the surrounding charcoal will ignite. Then when the fire starter has burned out, the surrounding charcoal will be hot and you stir up the charcoal to light the rest.
Pro Tip: If grilling, use two or three of the wood starters in various places to ignite the charcoal and speed up the process. If you only light in one area it will take longer to get to grill temperature.
Tumbleweed or Wood Shaving Fire Starters
Total Time To Grill: Less than 30 minutes
Similar to the wood blocks, tumbleweed (or similar style) starters are thin ribbons of wood shavings that are wrapped up and often coated with a food safe wax. We prefer these over wood blocks because they are easier to tuck into the charcoal and ignite.
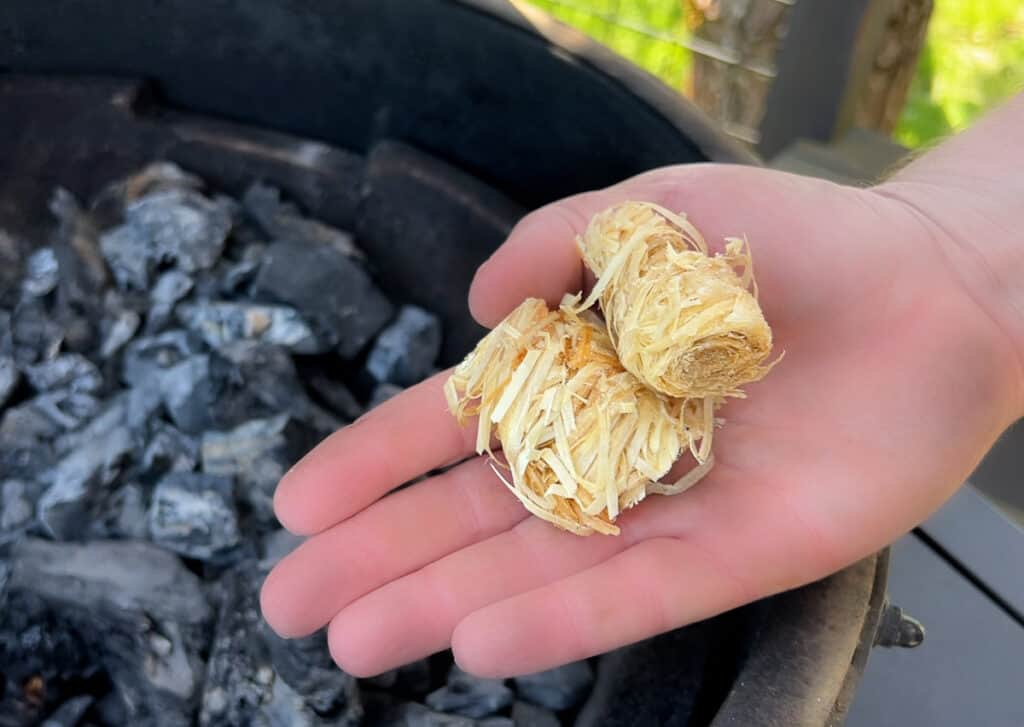
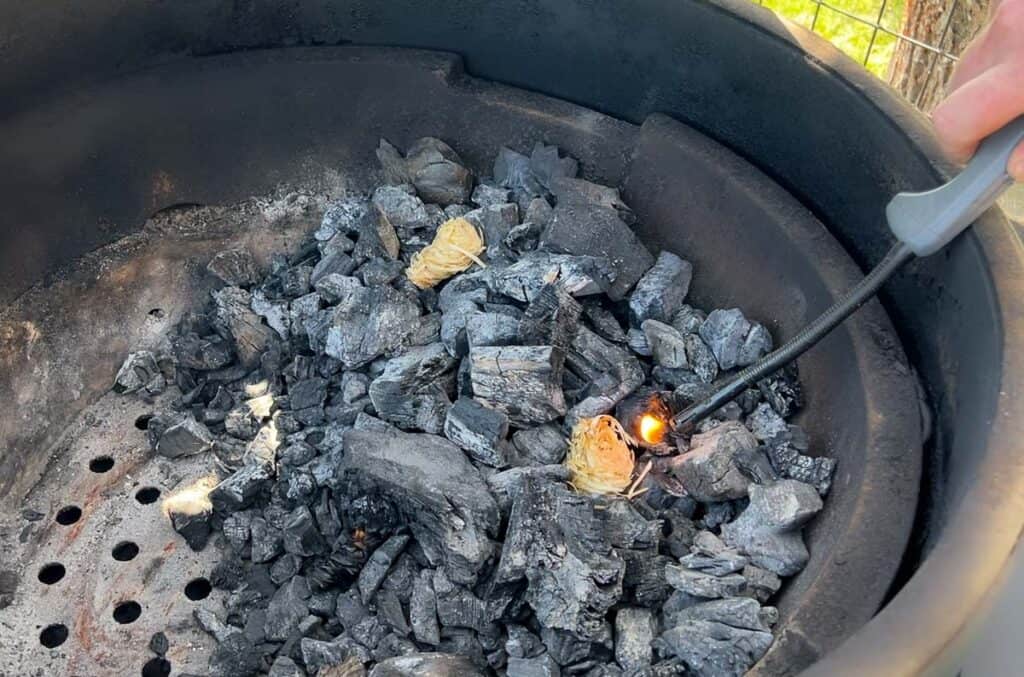
How to use them? Similar to the wood block fire starters, you place them within the charcoal. We will typically place it on top of the charcoal and then rest a couple of larger chunks like a log cabin over the top. Make sure there is adequate airflow. Then light the starter. When it burns out, the surrounding charcoal will be lit and you can stir up the charcoal. Use two or three if you are doing a direct grill or want to speed up the process.
Lighter Cubes
Total Time To Grill: Less than 30 minutes
Weber made paraffin wax lighter cubes popular. They tend to work better in adverse weather but they do require more airflow and space to get the charcoal started.
How to use them? You can use them in place of paper towel if using a charcoal chimney. If you do then be sure you use at least three of them. If using them to start the charcoal directly, lay them nestled into the charcoal.
Would you like to save this?
Be sure the top, or more narrow end, is facing up. We typically lay out at least two. Three if we are setting up the entire grill for direct grilling. Ignite and then carefully stack a few pieces of charcoal over the top. Allow it to light the charcoal and burn out completely.
When buying be sure the label says odorless and non-toxic wax.
Electric Starter – The Heat Gun
Total Time To Grill: Less than 20 minutes depending on the model
There has been a lot of investment in the electric charcoal starter. The newer versions look like hair dryers. There is an ignition source that strikes a flame and there is an electronic motor that blows air to intensify the flame causing the charcoal to ignite faster. It acts as both a lighter and a stoker.
How to use them? Layout your charcoal in your desired set up in your grill with the lid open. Ignite the electric starter and point the flame toward one specific spot of charcoal. We like the center. Initiate the blower function to concentrate the flame onto that area of charcoal. Let the charcoal turn white and burn with some red combustion, turn off the flame and turn on the just the blower element. Get the electric starter close to the heated charcoal and blow the fan directly on the lit charcoal.
The air will force the lit charcoal to expand onto other charcoal and you’ll see sparks flying. When an adequate amount of the charcoal is lit, you are done. Close the lid and allow the grill come come to your desired temperature. To speed up the process you can stir up the charcoal once you see a number of them lit.
The downside to these styles of starters is that you need to run them off a battery or a power cord, and you need to always keep butane (or other fuel source) as it uses fuel quickly. In windy or heavy rain they don’t work as well as other starters.
Electric Starter – The Classic Electric Iron
Total Time To Grill: Less than 30 minutes
They have been around for decades and work. This is the tool Kevin McCallister used to heat up his front door to ward off the bad guys in Home Alone.
The upside – set it and forget it. Downside – you need power. The electric starter has a heating coil that will get red hot and light charcoal it’s in contact with.
How to use it? Layout your charcoal in your grill. Tuck the heating coil into the charcoal as deep as you can get it. Some are designed at an angle to rest on the side of your grill, and others you just stick straight down. Then plug it in and let it warm up. When the charcoal is white hot surrounding the coil, remove the electric starter. Unplug it and store it on a non-flammable surface. The coil will still be hot.
Stir up your charcoal, add your grill grates and let the grill come to your desired temperature.
Cooking Oil and Paper Towels
Total Time To Grill: Less than 30 minutes, but to be clear this is not the most effective method and usually a result of poor planning.
If you are in a pinch you can soak paper towels with olive oil or vegetable oil. The oil allows the paper towel to burn longer. It’s also a messy method and you’ll need lots of towels and oil.
How to start with oil and paper towels? Place olive oil in a small bowl that is on top of a sheet tray. The sheet tray prevents oil from dripping all over your grill or counter. Trust us.
Soak a few individual paper towels completely in the oil. They should be dripping. Then tightly roll them up into a cylinder shape. Place them together within your charcoal.
You need a small space that is open to airflow so it isn’t smothering. Light the paper towel and gently place a few larger pieces of coal over the flame. You may need to do this a few times to really get the charcoal to ignite.
Twigs or Dry Sticks
There is nothing more primitive and time consuming then using dried twigs or sticks to light your fire. But this method is sometimes needed if you are at a park or camping.
The upside is that you look pretty cool lighting it up. The downside is that this method takes forever and is almost impossible if the wood is wet and it’s raining. This method is best if using a fire pit.
How to start your charcoal with twigs? Start by placing your smallest dry twigs in a log cabin setup. Pile them high. Add leaves, paper, or paper towel within the twigs. Light the twigs and continue to feed twigs until you have a good fire and ember base. Then add a couple of handfuls of charcoal until you see the edges of the charcoal nearest the fire turn white. Then your charcoal is lit. You may need to blow on it and add more twigs to keep feeding a continuous fire.
The Blowtorch
Total Time To Grill: Less than 10 minutes, 30 minutes if you plan to Instagram it
You can thank our friend, Mel Chmilar, from Darkside of the Grill for his amazing method of using a giant blowtorch and a leaf blower to power up his charcoal.
In all seriousness, if you have access to a propane igniter and blow torch you can use that to get your charcoal ready to go in less than 10 minutes. Use the igniter feature and get the flame going. Then point the flame at the center of your charcoal. When it’s lit, add your cooking grate and start cooking.
We suggest you skip using the leaf blower to stoke the heat. You are likely to lose your eyebrows. We love you Mel.
Tutorial Video
Pro Tips
- Don’t buy charcoal that is already soaked in a lighter fluid. You can see it right on the bag, it says “quick light” or “fast light”. You’ll still get the same chemical taste. So avoid that.
- Never use lighter fluid in a Big Green Egg or similar Kamado grill. The flavor will infuse within the ceramic. Even the manufacturer warns against using lighter fluid in these grills.
- Always have a stash of good matches and lighters on hand.
- And don’t forget to read our article on how to best shut down a charcoal grill.
About Vindulge
Mary (a certified sommelier and recipe developer) and Sean (backyard pitmaster) are co-authors of the critically acclaimed cookbooks — Fire + Wine and Fire + Wine Backyard Pizza — and have been creating content for the IACP-nominated website Vindulge since 2009. They live in Oregon on a farm just outside Portland.

Get a signed copy of our cookbook! Order Now
Tried this recipe? Give us a star rating and we would love to see! Mention @vindulge or use the hashtag #vindulge on all the social media handles. And consider subscribing to our newsletter where we drop all our favorite ideas and inspirations weekly.