This post may contain affiliate links. Read more at our disclosure policy.


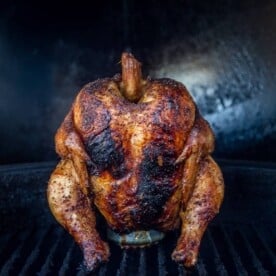
Wine Can Chicken is flavorful, moist, and incredibly tender. This grilled chicken takes the classic beer can chicken method to a whole new level with the addition of a can of wine.
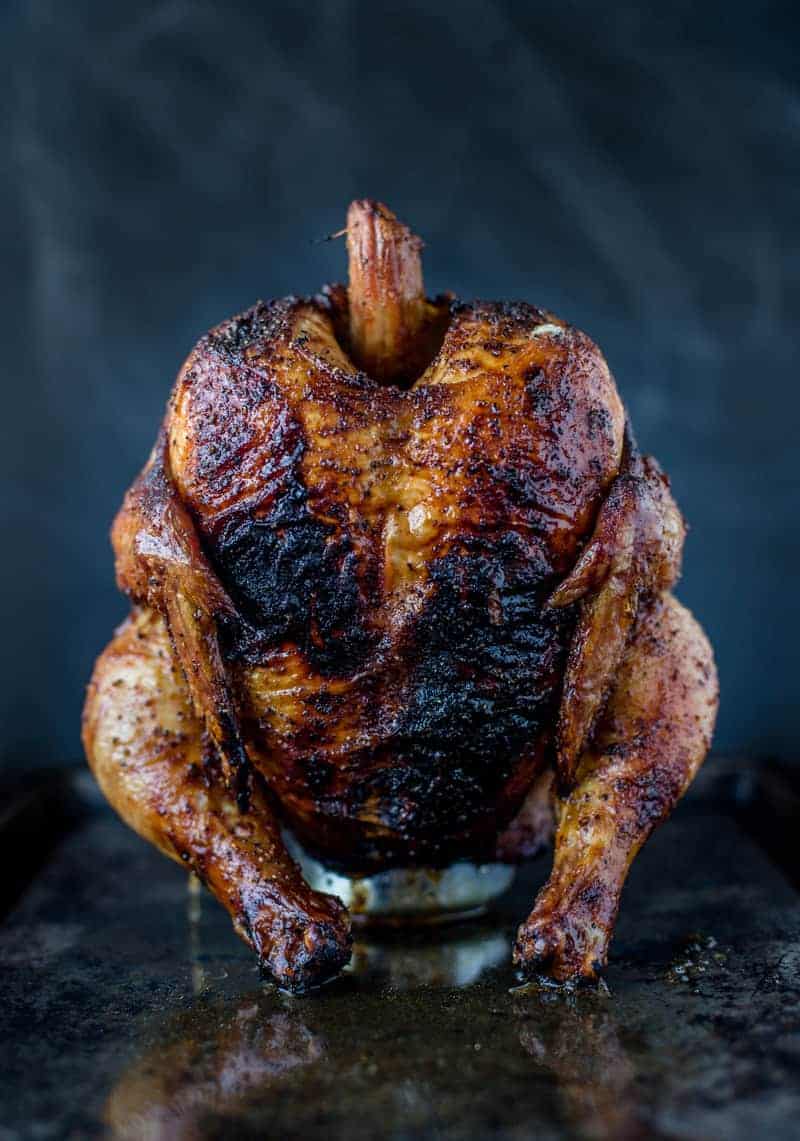
Wine Can Chicken is a method that uses the beer can chicken method to prop up chicken while smoking or grilling. As the heat warms the beer it boils and helps steam and keep the bird juicy. It’s similar to stuffing a chicken with aromatics when roasting.
Table of Contents
Ingredients + Substitions
- Roaster Chicken – Shoot for 4 – 5 pounds. It can also be used interchangeably with a fryer or a broiler chicken. Fryer and broiler chickens will tend to be smaller than a roaster, and so a can won’t fit easily in the cavity.
- Binder – We use olive oil on the chicken to help the seasoning stick to the meat. You can use stock, or even mustard. Be sure you get the cavity too.
- Seasoning – We use our all purpose pork seasoning with a blend of sweet, salt, and savory flavors.
- Canned Wine – Any canned wine that you would drink is a good option. White or reds work. I would not recommend using sparkling. Save that for sipping.
Substitutions: A fun way to add more flavor is adding fresh herbs into the open can of wine.
How to Prepare Wine Can Chicken
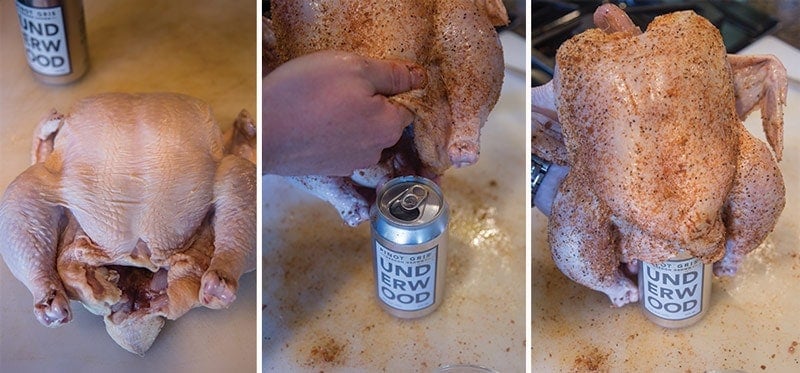
- Make sure giblets are removed from the chicken. Place chicken on a baking sheet. Pat dry with a paper towel and then lightly coat with olive oil.
- Liberally season the bird including the cavity. Then open the wine can and slowly insert it into the cavity, gently placing the bird back upright, using the can as a base.
- Be careful as to not tip the chicken and can over, spilling out the liquid nectar. In this case we used a can of Pinot Gris (Pinot Grigio). It has the fruitiest flavor that will impart juiciness and sweet flavors into the meat as it steams while cooking.
Grilling
Whether a Weber kettle grill, Big Green Egg, Pellet, or whatever grill you have, the key factor you need for your cooker is height inside your cooking chamber.
- Preheat your grill using the indirect cooking method targeting an internal temperature of 400 degrees F.
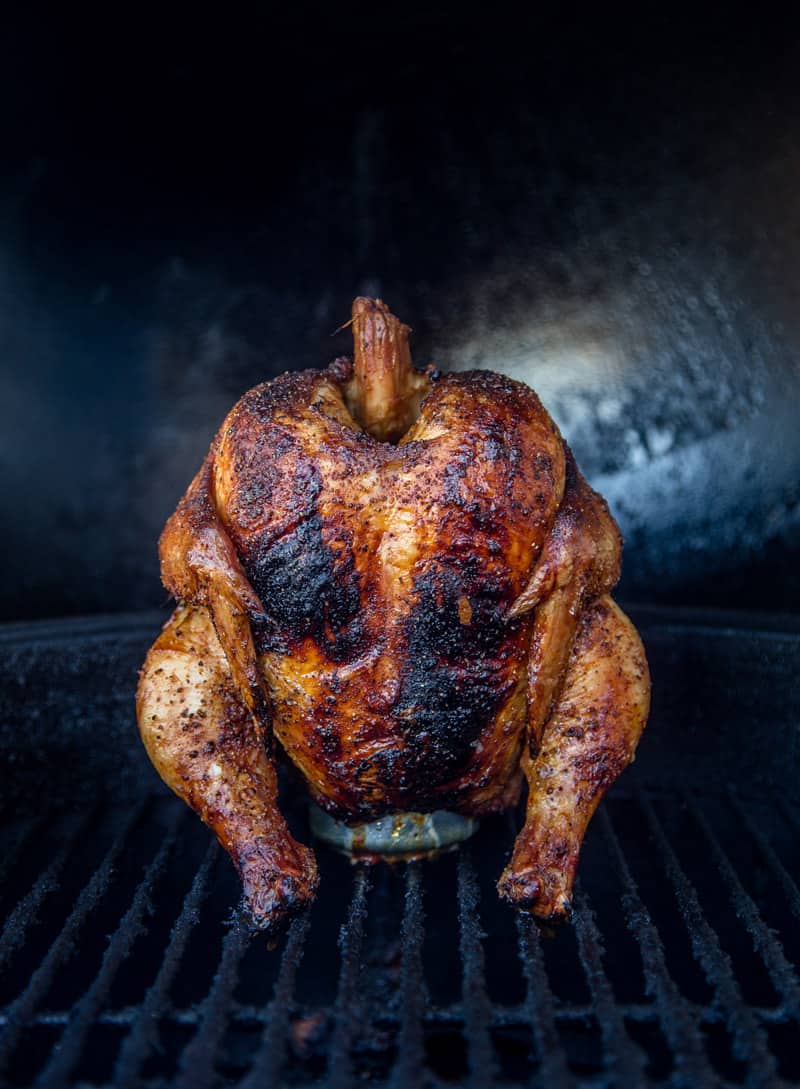
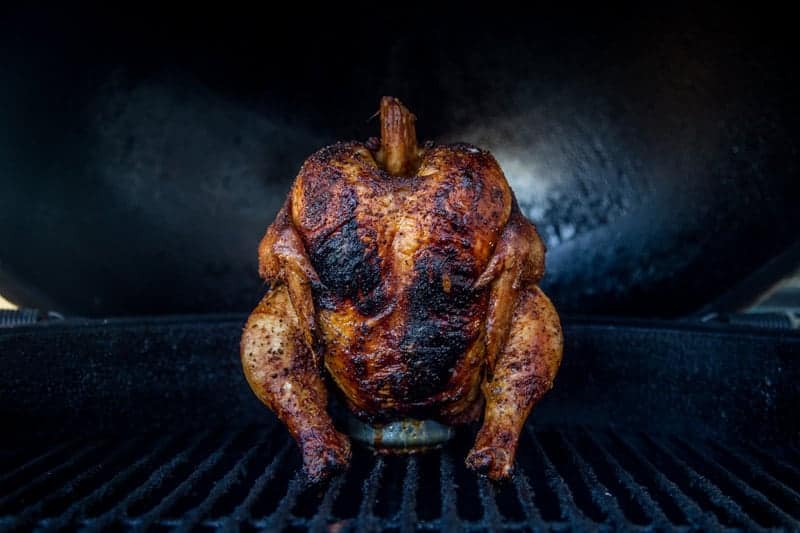
- Place the seasoned chicken and can upright on the grill grates on the indirect side of the grill when it reaches the correct temperature. We like to rotate the breast facing the direct heat as it takes longer to bring the breast up to temperature. If your grill runs hot, use heat safe gloves to rotate the chicken halfway through the cooking process for even searing.
- Remove the chicken when the internal temperature of the chicken breast at the thickest point reaches 155 degrees Fahrenheit.
- Let rest for 20 minutes to allow for carry over cooking to occur and the internal temperature to reach 160 degrees F.
How to Take Chicken Temperature
When using a digital meat thermometer, like a Thermapen, the key is taking the temperature in a few places of the chicken. The breast typically takes the longest to come up to temperature, this is why we have the breast facing the direct heat.
We temp it by inserting the probe so it is in the center of the breast, but not touching any bone.
We also take temperature in the thigh, by inserting an instant read probe, like the Thermapen, into the meat making sure to not touch the bone. We cook the bird to 155 degrees Fahrenheit as it reads in both locations. We have an article on pasteurization and the perfect chicken temperature that explains why we don’t wait until it’s 160 degrees.

It is common for the dark meat will come up temperature faster, and that is ok. Dark meat can handle higher temperature and not dry out (it’ll still be juicy even at 180 degrees). They key is the breast and thigh both are at 150.
Best Wine to use for Wine Can Chicken
There’s an increasing amount of wine cans on the market. My favorite for this recipe is Pinot Gris/Grigio. There’s a great fruitiness to the wine that imparts into the meat. The meat has a fantastic outside char and texture, but the inside is super tender and full of great flavor from infusing it with the wine.
Expert Tip
Just don’t drink the wine after you cook the chicken! That can, and all of the remaining wine in the can, must be discarded!
Wine Pairing
You can double up and use the same style of wine that you used for cooking the chicken. As long as it’s a fresh new can.
Alternatively, I love a rich Chardonnay for this style of chicken. It’s awesome with the char of the skin, tenderness of the meat, and juicy sweet flavors imparted by the wine. If you’re thinking, “Mary, I neeeeeed red wine!” then go for a lighter style Pinot Noir or Beaujolais for this.
What To Serve With Wine Can Chicken
Explore all of our side recipes or pick from some of our favorites.
Would you like to save this?
- Parsnip Puree – The juicy chicken is a great pairing with the rich and creamy flavor of parsnips.
- Grilled Carrots – Any grilled root vegetable is perfect but the sweeter flavors of carrots are awesome.
- Roasted Potatoes – Perfect potatoes oven roasted with crispy outside and soft inside.
If you like this recipe we’d truly appreciate it if you would give this recipe a star review! And if you share any of your pics on Instagram use the hashtag #vindulge. We LOVE to see it when you cook our recipes.

Get a signed copy of our cookbook! Order Now
About Vindulge
Mary (a certified sommelier and recipe developer) and Sean (backyard pitmaster) are co-authors of the critically acclaimed cookbooks — Fire + Wine and Fire + Wine Backyard Pizza — and have been creating content for the IACP-nominated website Vindulge since 2009. They live in Oregon on a farm just outside Portland.
Grilled Wine Can Chicken
Equipment
Ingredients
- 1 4 to 5 pound whole roaster chicken
- 2 tablespoons extra virgin olive oil
- ¼ cup all purpose dry rub (see notes)
- 1 375 mL can of white wine, preferably Pinot Gris (Pinot Grigio)
Instructions
- Prepare grill for direct/indirect cooking. Target temperature in the grill is 400 degrees measured on indirect side.
- Remove giblets from chicken, and pat dry. Lightly oil the chicken including the cavity. Apply dry rub liberally, including inside the cavity.
- Open the can of wine. You will insert the can into the cavity of the chicken, but do so slowly so the can does not tip. To do this, gently lower the chicken over the can into the cavity, the drumsticks will act like legs of a stool, with the can being the third leg.
- Place the chicken on the grill over indirect side with breast facing the heat side. Insert a digital meat probe if you have one. Be sure the drumsticks are positioned to prop the bird and avoid tipping.
- Cover and grill until the internal temperature of the breast and thigh are 160 degrees Fahrenheit. Can take 30 to 40 minutes depending on your cooker, the finished temperature is the most important.
- If your grill is smaller and you notice too much browning on the breast before it is done, rotate the bird 180 degrees so the breast faces away from you. Although be careful to not spill the wine or let it fall over.
Video
Nutrition
Nutrition information is automatically calculated, so should only be used as an approximation.


You left out the best part – to drink down the can of wine/beer about a 1/3 before placing the chicken on it. Also, why such high cooking temperature ? Using a pellet grill and lower and slower is best for chicken. Then you have more time to enjoy additional cans of wine / beer !
As an option, I like to insert cut up lemon, apple, herbs inside the chicken cavity.
Cheers !
Mary – We are intrigued with this recipe. We have a large BGE and left to my own devices I would use the plate setter to give me the indirect heat. Is there any reason that using it might not work? Many thanks.
Jim you can get the same result with the ConnEGGtor in place. No need to take it out. Just run the Egg at 400 and it will roast up nicely.
This is the most beautiful wine/beer can chicken I have ever seen! I bet the wine makes it so flavorful, especially a Pinot Gris of Pinot Grigio as you recommend!
This is like the BEST IDEA EVERY Mary! So much better than beer I bet, and there are so many canned wines to choose from nowadays! I’ll bet this recipe would be tasty with canned pinot gris, rose OR pinot noir!
I can’t help it; this post makes me giggle! There’s something about the chicken standing up on the drumsticks that cracks me up. That said, I think this is such a brilliant post to get complex flavor into a whole chicken. Great idea!
Genius!! I’ve had beer can chicken dozens of times but I never thought of wine can chicken.
Oh so worth it!
This is such a cool idea! I wish we had a grill, this would be such an amazing summer recipe 🙂
Thank you…and you definitely need a grill!
I absolutely love this idea! I will be trying this next weekend. Pinning now!